Prototyping and demoing the image recognition feature
Once all my frames have been created and the content is all set, I now need to prototype the file to create a working demo of how the app would work when used by an actual user, who can tap through and navigate the app interface.
Floralia figma frames
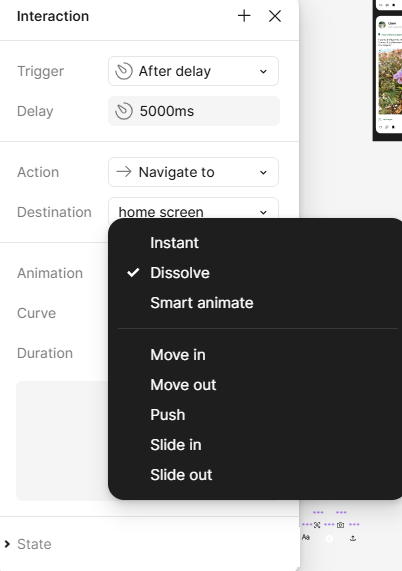
Prototyping in Figma is quite straightforward as it mostly includes dragging a wire from one component or frame to another. From there, you can adjust how the transition between the two occurs, whether it is instant or gradual, the direction in which the transition takes place, and what type of action occurs – such as a dissolving action, a push or slide up or down, or a smart animation.
Figma offers a variety of animation options
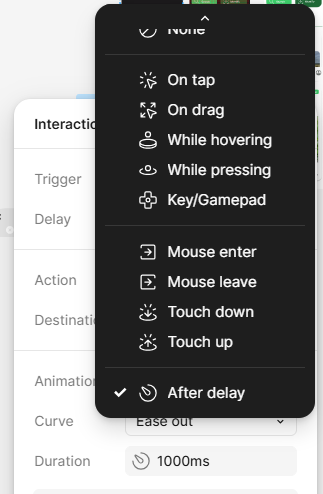
Figma also allows you to change the trigger action between frames
“Smart animate looks for matching layers, recognizes differences, and animates layers between frames in a prototype.” (Figma, nd)
What smart animate does is allows you to create smooth transitions between frames which use similar elements, creating a smooth animation between the two states. Like ‘tweening, smart animate ‘fills’ the gaps between states, acting as a bridge between point aand point b. One way I have utilised this feature is by creating a ‘pull to refresh’ feature on the notification tabs. I made three frames, one basic notification screen, one which pushes the content down with a ‘loading’ animation I made in After Effects, and another notification screen with new alerts at the top. Using smart animate, I wired the three states and used a ‘drag down’ action to trigger the transition before delaying and pushing back up, revealing the new updates.
The result is very smooth and realistically demonstrates this feature without any complicated code. You can see that it works as intended and provides a more immersive experience to the prototype.
Another way that I have formed a more interactive and immersive experience within the prototype is by using component states and variants. Elements can be easily turned into components which can have multiple states. From here, you can alter each state and wireframe them to react when interacted with. For example, I have used component states to create a button action, so that when pressed, the button changes to a slightly lighter shade to provide the user with visual feedback, before returning to its default state after the action has taken place.
A simple change in state (colour change) provides user with visual feedback when pressing a button.
“By providing visual feedback, component states guide users through interactions, making the interface feel more responsive and intuitive.” (HizkiaST, 2024)
In my previous post, I mentioned adding the option of switching between display modes in-app. This way, the user can decide if they want to browse in light mode or dark mode. In the settings, I added a slider button component, which I created two states for, allowing the user to switch between light and dark mode. Again, this is using components and state changes to indicate change and to make the experience more intuitive and immersive, as the UI switches depending on the user preference. From here, smart animate features transform the UI display, and the user can carry on exploring the interface as they were previously.
Actions and animations can be applied to component states to control the state change better
Image recognition
A main aspect of my project addressed in my proposal was the ability to use image recognition to identify plants which the user comes across. This was one of the most prominent features which I wished to include, although it was very ambitious as it is something I have never attempted before.
When I researched object recognition techniques, I realised that it would be hard for me to achieve without knowledge of coding or machine learning.
“A machine learning approach to image recognition involves identifying and extracting key features from images and using them as input to a machine learning model.” (MathWorks, ND)
This seemed unrealistic given my lack of knowledge and the fact that I only have a few months to learn how to implement this. It seemed that it would be quite a lengthy process regardless, as I would be required to create a data set that the AI can then refer to when identifying the plants.
Some alternative options I had explored included Protopie, which would allow me to simulate the use of the camera in real time, or a low code platform such as Thunkable, which would support integration of AI models such as Google Cloud’s Vision APO – however, this requires a paid subscription to use. Instead, I had to consider how I could provide a demonstration of this feature using Figma rather than creating an actual working image recognition feature.
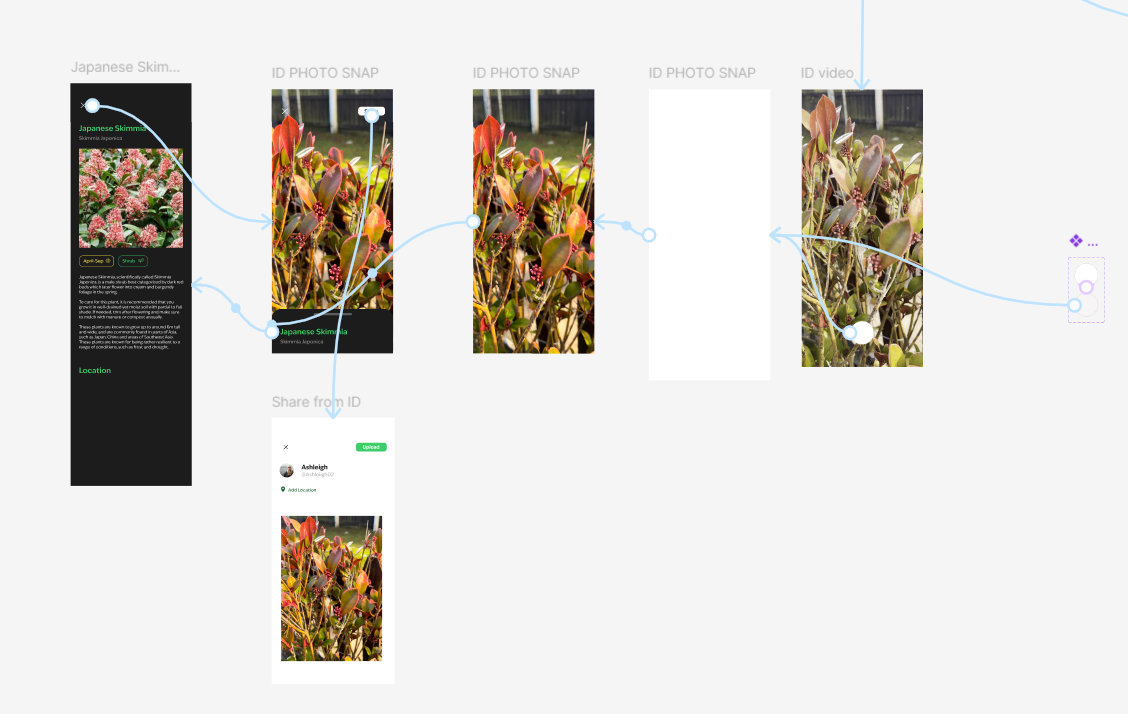
I figured that I could create a ‘placeholder’ effect by wireframing the prototype to load a pre-placed video clip with a shutter button, replicating the user opening the camera and shooting an image of a plant. From here, the frame would change to a single image from the video, indicating the user has ‘took an image’, before loading to bring up a card of the ‘identified’ plant. To explain this more clearly, I have created a storyboard to demonstrate how I intend this to work.
Image recognition low-fidelity sketch
When making this in Figma, I used slide effects to bring in a card when the plant loads up. The user can drag up to see more information about the plant, including instructions for care, the time of year that the plant grows, what type of plant it is (shrub, flower, tree), where the plant can be found, and posts friends have shared about the plant.
The user also has the choice to exit back to the home screen, or they can share the image to their profile, with the name of the plant tagged. Users can also edit the post to add text and location or can just post the image alone. When posting, the user is transported to their feed, which is updated to show their new post.
Figma flow for image recognition example
References:
Figma (nd) Smart animate layers between frames [Article]. Available online: https://help.figma.com/hc/en-us/articles/360039818874-Smart-animate-layers-between-frames [Accessed: 21/01/2025].
HizkiaST (2024) UX Blueprint 07 — Components state a friendly guideline on how to use it [Article]. Available online: https://medium.com/design-bootcamp/ux-blueprint-07-components-state-a-friendly-guideline-on-how-to-use-it-5ad549de05f1#:~:text=Component%20states%20refer%20to%20the,to%20expect%20from%20the%20interface. [Accessed: 21/01/2025]
MathWorks (nd) What Is Image Recognition? [Article]. Available online: https://uk.mathworks.com/discovery/image-recognition-matlab.html [accessed: 04/02/2025]